Friday, June 27, 2014

Guest Post: Manicured and Marvelous

Hi guys, it’s Rose here from Manicured and Marvelous. Today I’ll be showing you how to do an easy but beautifully stunning mani. I happen to enjoy this look for date night but you can rock it wherever, whenever… like Shakira, haha. Enough with the suspense! I’ll be showing you guys a how-to for a holographic gradient mani.
Warning: This mani may cause holo lovers to drool over your nails.

Items you’ll need:
  • Base: OPI Natural Base Coat
  • White Nail Polish: Sinful Colors Snow Me White
  • Makeup Sponge
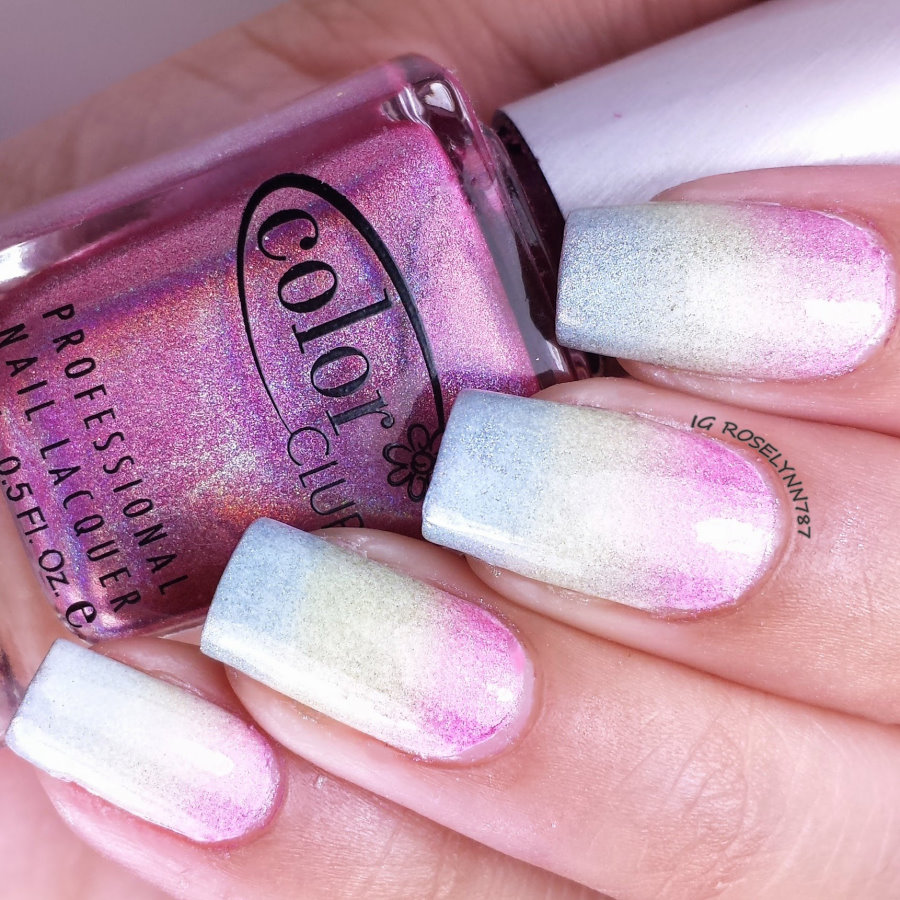
  • 3 Holographic Polishes: I’ll be using Color Club Miss Bliss, Blue Heaven, Kismet
  • Topcoat: Sally Hansen Triple Shine
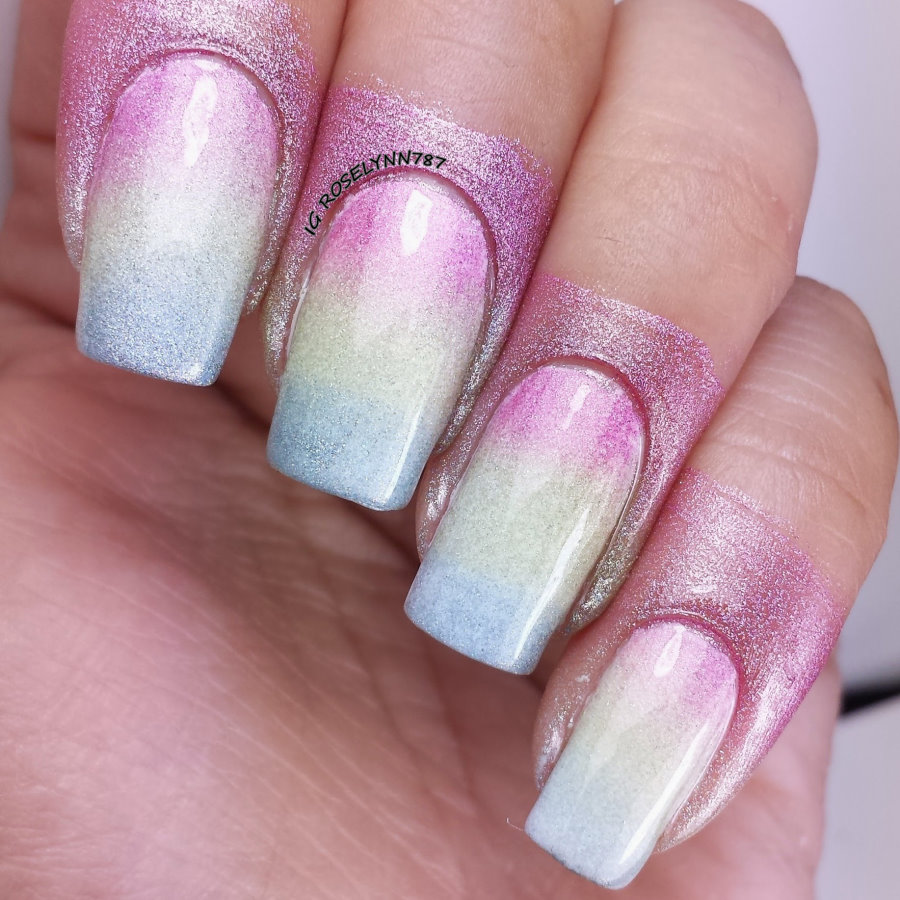
After applying a base coat, you’re going to paint your nails completely white. Don’t worry about streaking or being neat. You only need to make sure your nail is covered, preferable with one or two thin coat(s). Allow enough time for your polish to dry before moving on to the next step.
Next you’re going to take your three polishes and paint the sponge. Using the pink polish first, I make two thick lines on it, followed up by doing the same for the green, and afterwards the blue. You should make sure that the edges of your polish lines touch and blend in. Pat the sponge against a paper towel to remove some of the excess polish.
Now you are going to line up the sponge to the side of your nail and roll it. Repeat this two-three more times until you find the level of opacity you’d like to achieve. If you feel you need more polish on your sponge after the first roll, apply it in the same manner you did before. For this mani, I found myself rolling the sponge four times per nail. Personally, I use the same sponge for all five nails but you don’t have to.
Make sure you use a topcoat to further blend the colors and give it a beautiful glossy finish. And that’s it! Well almost… cause you know… the clean-up, haha.
I hope you guys have enjoyed this tutorial and try it out for yourselves. Come up with some fantastic color combinations of your own and have a blast. A special thank you to Steph for having me be a guest this today, I loved coming up with this for you all! Take care and see you later nail lovers, xoxo.


Thursday, June 26, 2014

Guest Post: Manic Talons

Hi Everyone. I’m Michelle from Manic Talons and am thrilled to show you this quick nail art design while Steph is away. I mostly feature gel polish on my own blog, but there are a few Indie polish brands that I simply can’t get resist. Girly Bits is one of them. I adore the formula and colors!

This mani uses two of the new Girly Bits Nail Lacquers that were recently released last Thursday, June 19th. The purple is There’s No Such Thing as a Purple Problem and is what Pam is calling a “shimmolo” finish. In other words, it is a scattered holographic polish. The second polish in this design is Betty Davis Eyes. Betty Davis Eyes is light silver, finely textured polish with a scattered holographic shimmer plus hints of blue and pink. Both of these beauties are shown here as two coats and apply like a dream! Now, that’s really saying something coming from me. As I mentioned earlier, gel polish is my thing. The beauty of gel polish is that is doesn’t dry until you cure it, so you can really take your time and use as many brush strokes as needed to get it right. I’ve been completely spoiled by that and often struggle with traditional polishes. So when I say a polish applies beautifully, it pretty much applies itself!
 The middle nail in this design is something new to me as well. I used the chevron style vinyl nail stencils from Neverland Laquers (formerly Pop Culture Cosmetics). I am a tape mani failure. Seriously, I have tried to use tape multiple times and never had it turn out right. Striping tape, scotch tape, masking tape, painters tape – all fails. These are the first nail vinyls I’ve tried and they completely changed my opinion of tape manicures! They are so easy to use and I didn’t have any of the seepage issues I experienced with the various forms of tape. I started with There’s No Such Thing as A Purple Problem as the base with top coat, applied the vinyl nail stencils once the base was dry, then applied one generous coat of Betty Davis Eyes and removed the stencils.

 Finally, I decided it needed just a little something more, so I added a cute little bow to the ring finger. Here’s a better look.
If you’re interested in gel polish or nail art in general, I welcome you to poke around on Manic Talons to see more of my work.

 Finally, a HUGE thanks to Stephanie for inviting me to write this guest post! :)

Michelle

Manic Talons: Facebook, Twitter, & Instagram

Wednesday, June 25, 2014

Guest Post: niftyBA

Hi-ya! This is Ali from niftyBA.com! I’m not sure about you, but here in Florida, summer is already on full blast. Even at 9AM, it is hot hot hot (and muggy!). Meh! Let me just go back inside, love on my air conditioning, and play around with some seasonally appropriate NAIL POLISHES! I thought I would share a polish I picked up recently that is perfect for summer AND may be on sale near you, too.

Meet Jolt, a color from the new Sephora Formula X line. It is part of the collection’s “Electrics” section. According to the website, Jolt is an “electric hot pink pearl.” This polish can be worn as a matte, or shiny with a top coat.  photo Jolt_zpsb5f55f4b.jpg  photo jolt3_zps8ce8e275.jpg I wanted to show Jolt with 1 coat dried matte, and with 3 coats with a top coat. I prefer wearing this and the other Electrics polishes I own with a top coat. Not much of a trouble to work with, just apply thinly and evenly so that the pigments (pearls?) do not clump.  photo jolt4_zpse1322ed6.jpg  photo jolt5_zpscc072b0d.jpg  photo jolt6_zps6f7b8b39.jpg The original price of this and many of the “specialty” (aka glitterbombs, special effects, etc.) Formula X polishes is $12.50. However, Jolt, along with several other Formula X colors, may be on clearance at your local Sephora. I have found them on sale for $4.99 at Sephora stores located inside JCPenny, and I have also seen some shades selling for $6.99 at Marshall’s stores. You can’t beat that!

Thanks Steph, for letting me hijack your blog for a day! Hope you had a great vacation, and have a lovely summer, beauty lovers!

Ali can usually be found hugging her baby son or fluffy orange cats. As a new mom, the days of super pointy stiletto nails are behind her for now, she still loves beauty products and collecting nail polish! Please stop by her blog niftyBA.com, or follow her on Instagram @niftyba.

Tuesday, June 24, 2014

Guest Post: Love, varnish, chocolate, and more...

Hi everyone! My name is Deborah and I'm one of the bloggers from the blog Love. Varnish, chocolate and more... which I run together with my friend Loqi. When Steph asked me to guest post I immediately agreed. I consider her a polish buddy, especially since I could join her as an admin for the Hobby Polish Bloggers Facebook group, and she's also one of the bloggers I have been following for years now and is actually part of the whole fun polish experience for me.

When thinking of something to create for her, at first I had a fun lime to grass green gradient in mind with some stamping. But then I went to a museum and saw a painting that I just had to translate to my nails. I know Steph loves art and she likes the color blue, so this felt like it was meant to be featured here :-).

Source: http://www.lost-painters.nl/noordbrabants-museum-jcj-vanderheyden-licht-tijd-en-ruimte/
The painting I used for my inspiration is called Deling Ultramarijn which translates to Division Ultramarine. It's painted by JCJ Vanderheyden in 1984. He was a Dutch artist that didn't just focus on paintings, but also worked as a photographer, sculptor and movie director along with other talents. Paintings can always trigger different emotions for everyone, but for me this specific painting showed a feeling of freedom, space, exploring the world. The ultramarine part of the painting resembling the ultra bright sky and the bottom half looking like the puffy white clouds you pass when taking off with a plane are what I see in this painting.

Deling Ultramarijn nail art
To create this look, I started with a base of OPI My Boyfriend Scales Walls (3 coats). After it dried I used a square cut brush and a sheer soft grey polish, and using short strokes I created some depth on the white base. Now it looked kinda murky and dark so using a stark white polish and the same technique, I brushed on the white over the grey. This now resembles the bottom half of the painting. Then I taped off the half of my nail and used Essence Cool & The Gang to create the top half of the painting. Carefully remove the tape and you're done! No topcoat because it looks more realistic without :-).

I am super proud how these came out - I'm usually not the creative or unique nail art kind of girl but these nails really stand out to me. Let me know what you think of it! Oh, and yes, that shade of blue doesn't seem to match... but I just couldn't get it to photograph right. Annoying blue shades freaking out the camera!

Deling Ultramarijn nail art

Deling Ultramarijn nail art

Deling Ultramarijn nail art


To see more of my work I invite you to check my InstagramFacebook & Twitter. I love to meet (new) readers!

Thanks for having me guest post Steph, and I hope you enjoyed this post :-).

Monday, June 23, 2014

Guest Post: Be Happy and Buy Polish

*Today's guest post is brought to you by Jessica from Be Happy and Buy Polish!

Hello everyone! I'm so excited to be guest-posting for Steph. She is definitely a blogger that I look up to, and her advice has been invaluable to me as a newer blogger.

For today's nail art look, I asked Steph what her favorite colors are (royal purple, cobalt blue, turquoise and gold), to create a look with those colors.
I've used 2 coats Mentality Wangari Matte as a base color all my nails but my ring finger, which was 2 coats of Mentality Sailor. Then using striping on my nails, I created a plaid look with Mentality Sailor and Mentality Royalty. I added a stud from the Born Pretty Store on my accent nail, and topped everything off with 2 coats of KBShimmer Clearly on Top.
I hope that Steph enjoys this look I created for her, I know I like it a lot! You can find me at my blog, Facebook, twitter, instagram, and tumblr.

Thanks again Steph for letting me be a guest-poster!

Sunday, June 22, 2014

Guest Post: MandysSecrets

Hey everyone! I'm Mandy from MandysSecrets, and my bff Steph was gracious enough to let me come in and take over for the day! You'll have to forgive me, I haven't exactly blogged in.. well.. a few months now, so I might be a bit rusty.

Have you ever had one of those polishes that you instantly fell in love with and just HAD to have only to be completely disappointed with it once you wear it? Yeah? Well then feel free to commiserate with me as you listen to my tale of woe. :(

Picture it: I'm walking down the nail aisle at Walmart, looking at all the polishes, and suddenly.. one stands out! Salon Perfect Plum Sorbet.. It's a beautiful, neon violet-red stunner that needed to come home with me right then. If you haven't seen it in person, think of a slightly more red Zoya Charisma. It's just different enough to where I felt that I needed both, and so with no questions, no second thoughts.. I took it to a good, loving home, and as soon as it got there it's true color started to show. (Pun intended.)
Please tell me how what is in that bottle turns into an (albeit still lovely but NOT what I was wanting) shade of burgundy when applied to my nails? You can even see how much of a difference my nails are from what's in the bottle! Other swatches of it that I've seen online may be a smidge darker, but nothing this drastic. Color deception aside, though, the formula was pretty good. Maybe a bit thin, but it's not terribly streaky and it doesn't drag like some neons do. Dry time was decent as well. My swatch is 3 thin-ish coats with 2 coats of Butter London's Lovely Jubbly for my accent nails, followed up with one coat of Seche Vite.

Side note: Lovely Jubbly is absolutely one of my favorite glitters ever. I love the colors, I love that it builds up to opacity, and I love that it doesn't eat top coat like no one's business. Butter London really does make some great polishes!

You know.. As I've been sitting here typing my post, I'm wondering if maybe adding some white undies would help brighten Plum Sorbet up? I *did* just buy the new OPI 1-coat white base coat from their neon collection.. I might have to give this one more shot, and I'll be sure to post my findings on Instagram! (@MMMandysSecrets if you care to find out what happens!)

Many thanks to Steph for letting me come over to play today! It was fun to take some time to photograph and edit nail pictures and type up a proper post again! Have you ever tried Salon Perfect Plum Sorbet? I'm curious to know if this is like.. a "thing" with this polish or if I just got a dud bottle? And do you think undies will help it? I'd love to hear your feedback! -- Mandy

Friday, June 20, 2014

TTFN & Orly Ablaze

*Ta ta for now, friends! This Sunday, I'm off for vacation for 6 days! This will be my first vacation in 3 years! I'll be spending time with my boyfriend and parents on the central coast of California for some relaxation and cooler weather. I have some amazing guest posters for you all next week. I'll be around on social media, but I won't be blogging until I get back! See you back here on June 30th!*

Orly totally nailed it with their summer Baked collection. I haven't been this excited over a mainstream collection in a long time. Neons cremes are everywhere.  I love neon cremes, but I get it. Been there. It's been done. Let's try something different. How about adding some shimmer into these neons? Orly, thank you! I have one of the standouts of this collection for you today.

**Note I did have to adjust light and color for to show an accurate representation of this shade

Ablaze
Ablaze is a neon orange with a golden shimmer.

Color: Do I even really need to comment? This is a fiery neon orange with a standout shimmer. I've seen shimmers in neons before that barely show on the nail. This shimmer isn't joking around. This is one amazing and incredible nail polish color.

Formula: Excellent easy to apply formula. Zero complaints. I used 2 coats above.

Price: I purchased this at Sally's Beauty Supply in the $7 range.

Overall: Go out and get Orly Ablaze now. You need this. I think it's mandatory for every polish addict to get this color. This is an incredible neon! Must have. This is totally a contender for the Top 25 of 2014. I won't even call it a contender. This will be on the list. There is a spoiler for you. Get this polish!

My Rating 5 out of 5 Paint Splatters
Happy Friday!

Thursday, June 19, 2014

Throwback Thursday: China Glaze Golden Enchantment

Back in January I did a massive purge of nail polish. I'm pretty sure I removed probably over 300 bottles from my collection. These were colors I no longer used, had similar color of, or just no longer liked. I have these boxes of polishes still waiting around for swaps or to let friends pick from. I recently went through these boxes and discovered a China Glaze one I did not want to part with any longer. I adopted it back into my collection, and I'm happy I did. 

Golden Enchantment over KBShimmer Touch of Glass

Golden Enchantment is a golden micro holographic glitter topper.

Collection:  Fairy Fashion 2004/2005 (?)

Color: This is a gold holo glitter topper! I love that it's gold. There are countless holo glitter toppers that are silver, and it's so nice to have a gold one! Yay for gold!

Formula: This is is a smooth and easy to apply formula. I used 1 coat above. You're not going to get much build with this polish, nor will you ever achieve opacity, but that's not the point. This just adds a nice subtle effect.

Price: A Google search will find you plenty results for this polish either on eBay or etailers in the $2.50-$7.00 range.

Overall: I love this oldie polish. I feel bad I wanted to dump it at one point, but it's here to stay now. I love the effect this golden holo glitter gives on many polishes. This is a great polish to have in your collection.

My Rating: 5 out of 5 Paint Splatters
Happy Thursday!

Wednesday, June 18, 2014

Way-Cool Mani Wednesday: Blue Crushin SOTT

Do you have a favorite glitter/effect topper? This was a question I saw asked around in some nail related FB groups recently. I do have a favorite effect topper, and it's Essie Shine of the Times, a beautiful iridescent flakie. This polish has never seen the walls of my Helmer. Well, I have a back up bottle that rests there, but my original bottle is always out on my desk where I paint my nails.

Shine of the Times is my go-to layering polish when I want to add something special to a mani. The flakie looks different dependent on what type of color you layer it over. It's magical, and it looks great on everything. 

Here is an awesome combination a did recently with Shine of the Times. 

Polishes Used:  Sinful Colors Blue Crushin and Essie Shine of the Times

Happy Wednesday! 

Tuesday, June 17, 2014

Zoya Dot

I have one of the spring Zoyas to share with you today, Yes, it feels like summer, but it's still technically spring. This is color I was pleasantly surprised by. I never would of purchased it on my own, but it came in an Ipsy bag a little while ago. It surprised me in good ways, but I can't say it is a real winner for me.

Dot
Dot is a soft petal pink creme.

Color: This is a very go-to wearable soft pink. This is a one of those colors that will look good for any occasion. I like the softness of this pink. Pastel/pale pinks can give me lobster hands (make my fingers look super red). Dot, is a little more friendly on me than some other pale pinks. It's not perfect, but I comfortably wore this color for a few days, and didn't feel like people would look at my hands and think I'm ill.

Formula: Another surprise here. This formula isn't perfect, but I was expecting a sheer countless coats to make opaque pink here. That wasn't the case. This covered my nail nicely in 3 coats. My issue with this formula is it didn't want to level on my nail, which is apparent in my swatch photo.

Price: This is $9.00 on the Zoya website.

Overall: I do like this. I was surprised it was pink that looked nice on me, and I'm surprised it was a full coverage opaque color. I wore this as a mani, and I liked it. It's not a favorite, and it does have its drawbacks as far as formula. This a like that leans towards the side of OK for me, rather than a love.

My Rating: 3 out of 5 Paint Splatters
Happy Tuesday!

Monday, June 16, 2014

OPI Feel the Mo-heat-oes

I am rarely impulsive with nail polish buying anymore. New mainstream collections come out, and I either don't touch them at all, or wait a few months to decide if there is anything I really want.

Limited edition/exclusive collections are another story. I heard about this OPI Hello Flamingo! collection that was exclusive to CosmoProf and I got that impulsive buy itch. CosmoProf is a store for beauty professionals only. I can't go. I want something I'm not supposed to have. One of the colors in this collection is an awesome minty green called Feel the Mo-heat-oes. I needed it.

I scoured eBay and I found it for $12.50. The bad news is I'm an idiot for paying that price, the good news is you all don't have to pay $12.50 if you want it. You can purchase these polishes on Ave You for the standard $8.50 OPI price.

Feel the Mo-heat-oes
Feel the Mo-heat-oes is a pastel mint green creme.

Color: The first question is what makes the mint green different from the others? This stands out as more of a green-toned than blue-toned mint. I also find this green has a bit of retro feel to it. This color is very Miami Art Deco District. This is a gorgeous shade of a green and definitely unique in my collection. Also, it's a flattering green! Greens can be tricky with my skin, but this one complements nicely.

Formula: Nice easy to use formula. I used 2 coats above. OPI formula can be hit or miss for me, but this formula was great.

Price: As mentioned above you can purchase this on Ave You for $8.50.

Overall: I adore Feel the Mo-heat-oes! I'm going to call it a must have, and it's going on my Top 25 of 2014 contender list. Gorgeous pastel mint green, that is unique, fun, and flattering!

My Rating 5 out of 5 Paint Splatters
Happy Monday!

Friday, June 13, 2014

Silly Bee's Chickadees Island in the Son Collection

*Press Sample*
*The following products were sent to me in exchange for my honest review. 

I have a fun and summery Silly Bee's Chickadees collection to share with you today. This collection is in support of Melissa's (Silly Bee's Chickadees' creator) mission trip to Jamaica in July. 100% of the sales of each bottle sold will go toward lunches being served to close to 600 children in summer school and vacation Bible school. Melissa makes some amazing polishes and does some amazing work for charities.

On to the pretties!

 L-R: Guava-rama, Mango Mambo, and Papaya Yaya

Guava-rama
Guava-rama is a magenta pink jelly with gold dot glitters.

Mango Mambo
Mango Mambo is a golden yellow jelly with gold dot glitters.

Papaya Yaya
Papaya Yaya is a coral-orange jelly base with gold dot glitters.

Colors: These are perfect fruity colors for summer. The colors are saturated and bright. The gold dot glitters are unexpected, but a welcome addition the polish! Jelly and glitter combos are one of my favorites when it comes to nail polish.

Formula: The formula on all of these had a nice jelly-like formula. The formula is a hint on the thick side, but these applied very evenly. I used 2 coats for Guava-rama and Papaya Yaya. I used 3 coats for Mango Mambo. The glitter in here is sparse, but I was able to easily get a few glitters on each nail. I have short nails, so I'd imagine the longer the nails, the more glitter you'll get on them!

Price: Full size bottles are $10.00 each and the trio of mini bottles is $12.00. You can purchase on Silly Bee's Chickadees etsy site.

Overall: Beautiful collection of summer jelly glitters! The colors are great and the formula was on par. This is a cute collection that really serves an excellent cause.

My Rating: 4.5 out of 5 Paint Splatters
Be sure to check out Silly Bee's Chickadees on Facebook and Instagram.

Happy Friday!

Thursday, June 12, 2014

Throwback Thursday: OPI Pamplona Purple

I'm a very seasonal color polish wearer. I save my vamps and dark colors for fall and winter, and wear my brights and pastels for spring and summer. I pretty much follow this faithfully. It's not because I feel like I have to it, it's really just my polish mood tends to fit the season. That being said, sometimes I want to reach for an all-around color. A color that really doesn't fit a particular season, but could fit them all. This OPI classic purple fits that bill for me. 

Pamplona Purple
 Pamplona Purple is a medium red-toned purple creme.

Collection: Spain Fall 2009

Color: This is the perfect middle of the road purple shade. This isn't too bright or too dark, Pamplona Purple is just right. I also love that this a fun red-violet shade, while still being very classic at the same time. Does that make sense? This is kind of an every woman shade in my opinion. Anyone could pull this color off.

Formula: Great easy and smooth formula. OPI can be hit or miss with me personally as far as formula, but this was a hit. I used 2 coats above.

Price: This can be found in the $8-$9 range. I believe this is part of the core line so it can be found at Ulta and many salons that carry OPI. Also a quick search on the web brings up many results for it.

Overall: I love this purple. This is actually a recent polish in my collection, and I find myself gravitating toward it a lot. The color is perfect for any time of year and it's really a very flattering color. I love Pamplona Purple!

My Rating: 5 out of 5 Paint Splatters
Happy Thursday!

Wednesday, June 11, 2014

Way-Cool Mani Wednesday: Summer Citrus

It's hot. I hate the heat. We've been through this. I've been craving watermelon and other bright and refreshing fruits lately. So why not a summery citrus colored mani? 


Polishes Used: Pixi Lime Luster, Zoya Rica (over Zoya Maya), and Zoya Godiva. 

Doesn't this make you want some tropical drink on a breezy beach? I'm game.

Happy Wednesday! 

Monday, June 9, 2014

Rimmel Barmy Blue

This next polish is from the newer Rimmel Salon Pro line. As I've mentioned before I am incredibly impressed with this line. The polishes have a gel-like finish and a top notch formula. The best part of these polishes is they're $2.99! I have an amazing cobalt blue to share with you today.

Barmy Blue
 Barmy Blue is a deep cobalt blue in between a jelly and creme (crelly?).

Color: Cobalt blue has definitely been an on trend color in nail polish for the last 2-3 years. This shade of blue is actually darker and more saturated than some of my other brighter blues. Barmy Blue is unique to me, and it's a great color!

Formula: Excellent formula here. This had the same buttery and smooth formula as the other Rimmel Salon Pro polishes I have tried. The finish is not quite a jelly finish, but not quite a creme either. I guess that constitutes it as a crelly? I used 2 coats above.

Price: I paid $2.99 for this at CVS. CVS tends offer Rimmel every so often  as BOGO 50% OFF. I'd recommend you stock up on a few of these then!

Overall: Barmy Blue is an excellent color with excellent formula at a very affordable price. I highly recommend this color and other colors from the Rimmel Salon Pro line. My only complaint is I wish this line had a wider range of colors.

My Rating: 5 out of 5 Paint Splatters
Happy Monday!